Introduction: Deep Fried Turkey Recipe – A Step-by-Step Guide
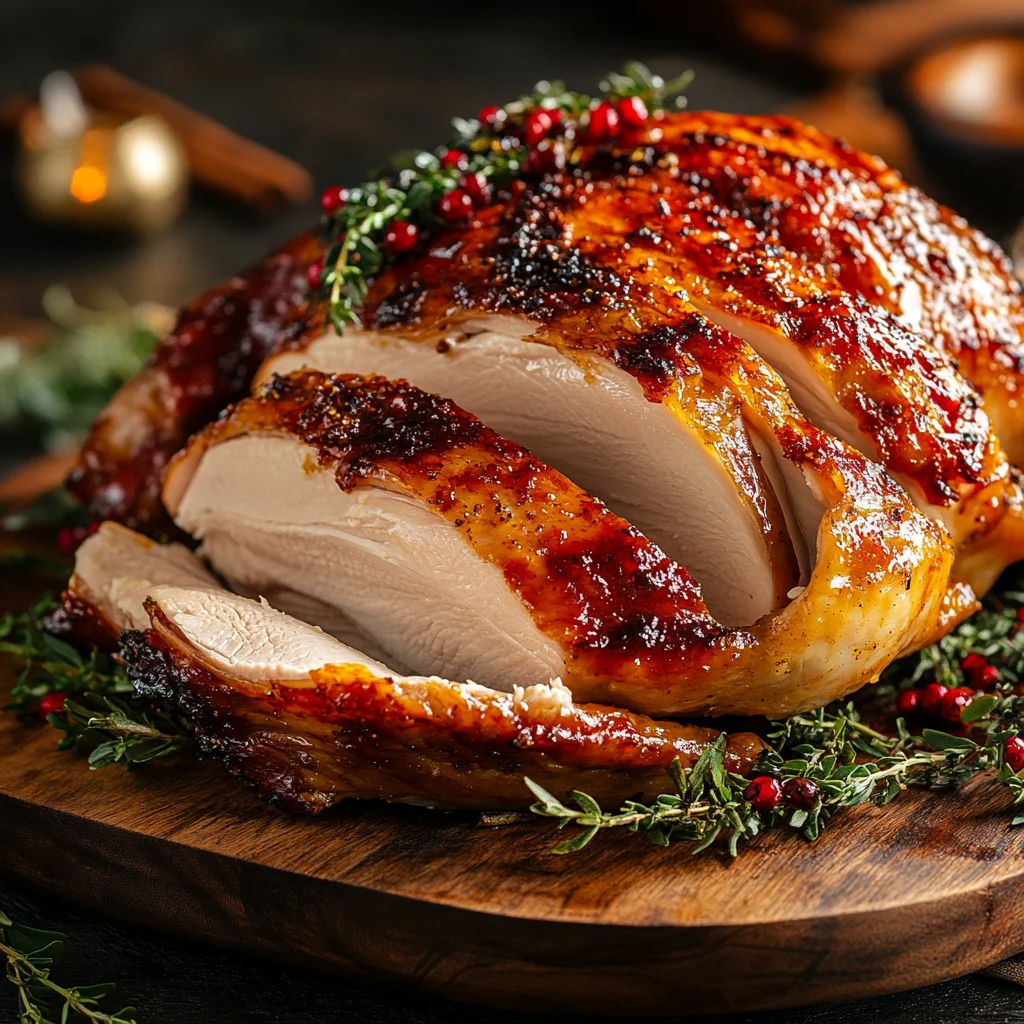
Deep frying a turkey is a fantastic way to elevate your holiday meals. Not only does it create a crispy skin, but the inside stays incredibly moist and tender. Whether you’re looking to impress your guests or simply want a new way to cook your turkey, this deep fried turkey recipe will guide you through each step.
This article will cover everything you need to know: from ingredients to equipment, to the best techniques for deep-frying your turkey. Plus, we’ll include tips to ensure the turkey turns out perfect every time.
Table of Contents
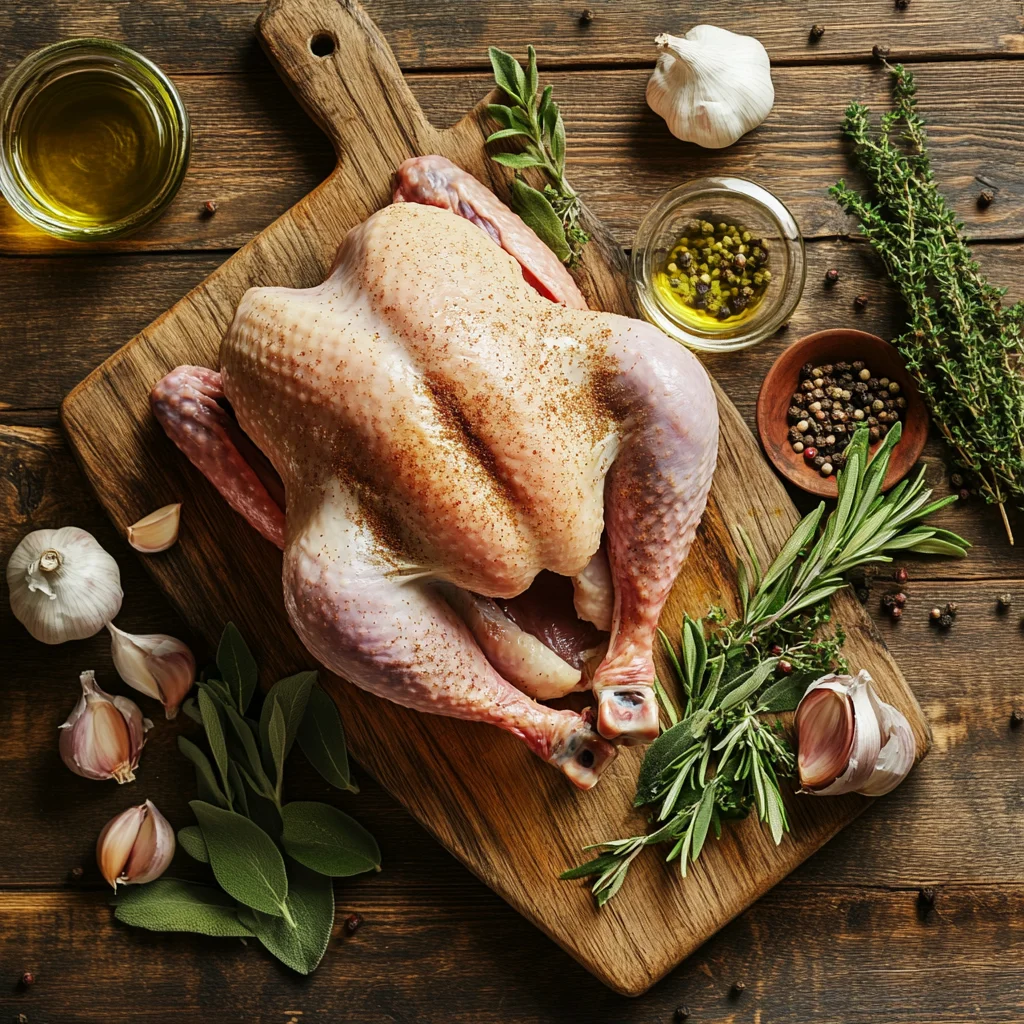
Part 1: Ingredients for the Perfect Deep Fried Turkey
In this part, we’ll list all the ingredients you’ll need for your deep fried turkey recipe. The key to achieving the perfect turkey lies in using the right combination of ingredients and ensuring you follow the preparation steps closely.
Main Ingredients:
- 1 Whole Turkey (10-14 pounds) – Ensure the turkey is completely thawed before you begin. A frozen turkey can be dangerous to fry and will not cook evenly.
- Peanut Oil (4-5 gallons) – Peanut oil has a high smoke point and is ideal for frying. You can substitute with other oils like canola oil or sunflower oil, but peanut oil is preferred for its neutral flavor and high-temperature tolerance.
- Seasoning or Rub – You can use your favorite dry rub or make a seasoning mix using paprika, garlic powder, onion powder, cayenne pepper, and black pepper. For a unique twist, try using a Cajun seasoning mix.
- Marinade or Injection (Optional) – If you prefer a more intense flavor, you can inject the turkey with a marinade. Common ingredients for the marinade include butter, chicken broth, garlic, and herbs like rosemary and thyme.
Tools and Equipment:
- Turkey Fryer – A large fryer with a stockpot (30-60 quarts) is necessary for deep frying the turkey. Make sure the fryer has a temperature gauge.
- Propane Burner – This will be used to heat the oil to the correct temperature.
- Thermometer – A deep-fry thermometer is essential for monitoring the oil’s temperature.
- Tongs or Fryer Basket – Used for carefully lowering the turkey into the hot oil.
Optional Ingredients:
- Herbs and Citrus – Thyme, rosemary, and lemon zest can be stuffed inside the turkey for additional flavor.
- Injection Syringe – If you want to inject a brine or butter marinade into the turkey for more moisture, a large syringe is needed.
Part 1.1: Step-by-Step Instructions for Preparing the Deep Fried Turkey
Now that we have all the ingredients ready, let’s go over the steps to properly prepare your turkey for deep frying. By following this guide, you’ll achieve that perfect crispy exterior and moist interior every time.
Step 1: Thaw and Dry the Turkey
Ensure the turkey is completely thawed. A frozen turkey will cause dangerous splattering when submerged in hot oil. Thawing a 12-pound turkey will take about 3-4 days in the refrigerator. Once thawed, remove the giblets from the cavity and pat the turkey dry with paper towels. This is a crucial step because moisture on the turkey will cause oil to splatter, leading to burns or uneven cooking.
Step 2: Season the Turkey
Apply your seasoning or dry rub generously to the turkey. Make sure to coat both the inside and outside of the bird for even flavor. If you are injecting the turkey with a marinade, use the syringe to inject it into the thickest parts, especially the breast, thighs, and legs. This will keep the turkey moist during the frying process. For a stronger flavor, allow the turkey to marinate for at least 30 minutes before frying.
Step 3: Heat the Oil
Set up your fryer outdoors, away from any structures or flammable materials. Fill the fryer with peanut oil, ensuring the turkey will be fully submerged when lowered into the oil. Use the water displacement method to check the oil level: place the turkey in the fryer without turning on the heat and mark the oil level. Remove the turkey, and fill the fryer with oil up to the mark.
Heat the oil to 350°F (175°C). Use the thermometer to monitor the temperature. It’s critical to keep the oil at this temperature throughout the frying process. If the oil temperature drops too much, the turkey will absorb too much oil and become greasy.
Part 1.2: Lowering the Turkey into the Oil
The next step involves the actual deep frying of the turkey. Safety is paramount here, as hot oil can be dangerous.
Step 4: Lower the Turkey Slowly
When the oil reaches 350°F (175°C), carefully lower the turkey into the hot oil. You can use a fryer basket or tongs for this. Slowly lower the turkey, as a sudden drop can cause oil splashes. It’s important to move slowly to avoid burning yourself or splattering oil outside the fryer. If you’re unsure about the turkey’s weight or oil level, you can check the turkey’s weight to estimate the amount of time it will take to cook.
Step 5: Fry the Turkey
Now that the turkey is safely in the oil, fry it for 3-4 minutes per pound. For example, a 12-pound turkey should fry for 36-48 minutes. Keep an eye on the oil temperature and ensure it stays at 350°F (175°C) throughout the cooking process. If the temperature goes down, it could result in undercooking or greasy turkey.
Part 2: Cooking the Deep Fried Turkey to Perfection
Now that your turkey is seasoned and the oil is hot, it’s time to begin the actual cooking process. This part of the recipe covers the key steps for deep frying the turkey, ensuring that the meat stays tender while achieving a crispy, golden exterior.
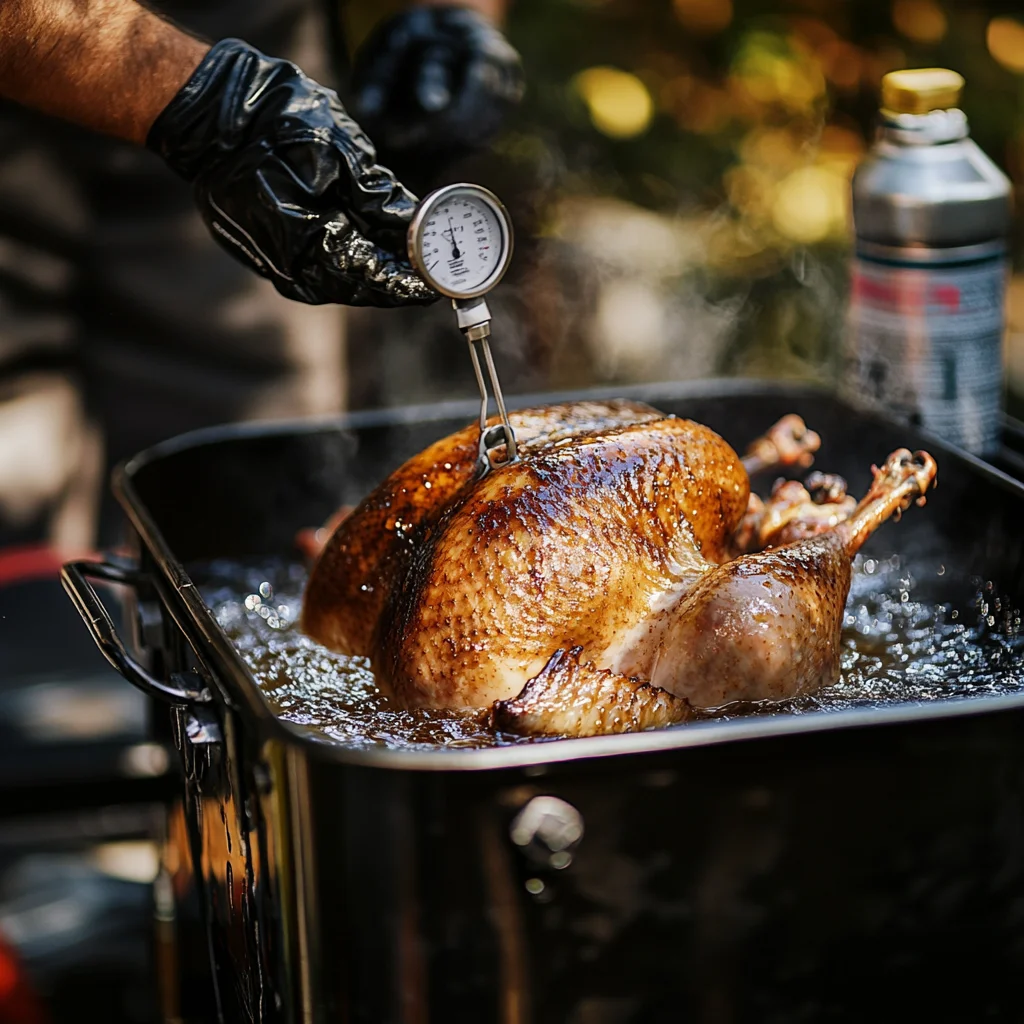
Step 6: Monitoring the Oil Temperature
Maintaining the oil temperature is crucial when deep frying a turkey. You need to keep it around 350°F (175°C). If the temperature is too low, the turkey will absorb excess oil, making it greasy. If it’s too high, the skin might burn before the inside is fully cooked.
Tip: To monitor the temperature, use a high-quality deep-fry thermometer that’s designed to withstand high heat. Place the thermometer in the oil and check frequently to ensure it remains at the optimal 350°F.
Step 7: Cooking Time for Deep Fried Turkey
As a general rule, you should fry the turkey for 3-4 minutes per pound. A 12-pound turkey will typically take about 36-48 minutes to cook thoroughly.
Example Cooking Times:
- A 10-pound turkey: 30-40 minutes
- A 14-pound turkey: 42-56 minutes
The key to perfect deep-fried turkey is to avoid rushing the process. Be patient and make sure the turkey cooks evenly. A turkey fryer usually has a built-in timer to help keep track of the cooking time, but it’s always good to check the temperature of the meat itself.
Step 8: Checking for Doneness
The turkey is ready when the internal temperature reaches 165°F (74°C) at the thickest part of the breast and 180°F (82°C) in the thigh. To check, use a meat thermometer. Inserting the thermometer into the turkey’s breast or thigh will provide an accurate reading. It’s essential to check the temperature in both spots for the best results.
Tip: To avoid overcooking, insert the thermometer toward the end of the cooking process. Pull the turkey out as soon as it reaches the desired temperature.
Part 2.1: Safety Tips for Deep Frying a Turkey
Deep frying a turkey requires extra caution. Working with hot oil can be dangerous if you don’t follow proper safety measures. Let’s go over some crucial safety tips to ensure you cook your turkey safely.
Step 9: Keep a Safe Distance
Always fry your turkey outside, on a flat, level surface, away from anything that could catch fire, such as trees, buildings, or wooden decks. Never fry a turkey indoors, in a garage, or on a balcony. The high heat and potential oil spillage can be hazardous.
Tip: Make sure children and pets are kept away from the frying area at all times. It’s best to designate a clear perimeter to ensure no one gets too close.
Step 10: Wear Protective Gear
Wear long sleeves, safety gloves, and closed-toe shoes when handling the hot oil. Also, use safety goggles to protect your eyes from splattering oil. These simple precautions can help prevent burns or accidents.
Step 11: Use the Right Equipment
Only use turkey fryers that are specifically designed for deep frying. Be sure the fryer has safety features, such as a temperature control system and an automatic shut-off mechanism to avoid overheating. Make sure you have a fire extinguisher on hand, just in case.
Part 2.2: Removing the Turkey from the Oil
Once your turkey has reached the perfect doneness, it’s time to carefully remove it from the fryer. Here are the steps to do it safely.
Step 12: Turn Off the Heat
Before removing the turkey, make sure the propane burner is turned off. Let the oil cool slightly for a minute before beginning to lift the turkey out of the oil. This ensures there’s no risk of flare-ups once the bird is out of the fryer.
Step 13: Lift the Turkey Slowly
Use your fryer basket or tongs to slowly lift the turkey out of the hot oil. Allow the oil to drain from the turkey by holding it in the air for a few seconds. This helps remove excess oil, leaving you with a crispy, golden exterior.
Tip: Be cautious and avoid tipping the turkey during this step to prevent hot oil from spilling.
Step 14: Let the Turkey Rest
Once the turkey is fully drained, place it on a large platter or cutting board. Let it rest for about 10-15 minutes before carving. This resting time helps the juices redistribute throughout the turkey, keeping it moist and flavorful.
Part 2.3: Carving and Serving the Deep Fried Turkey
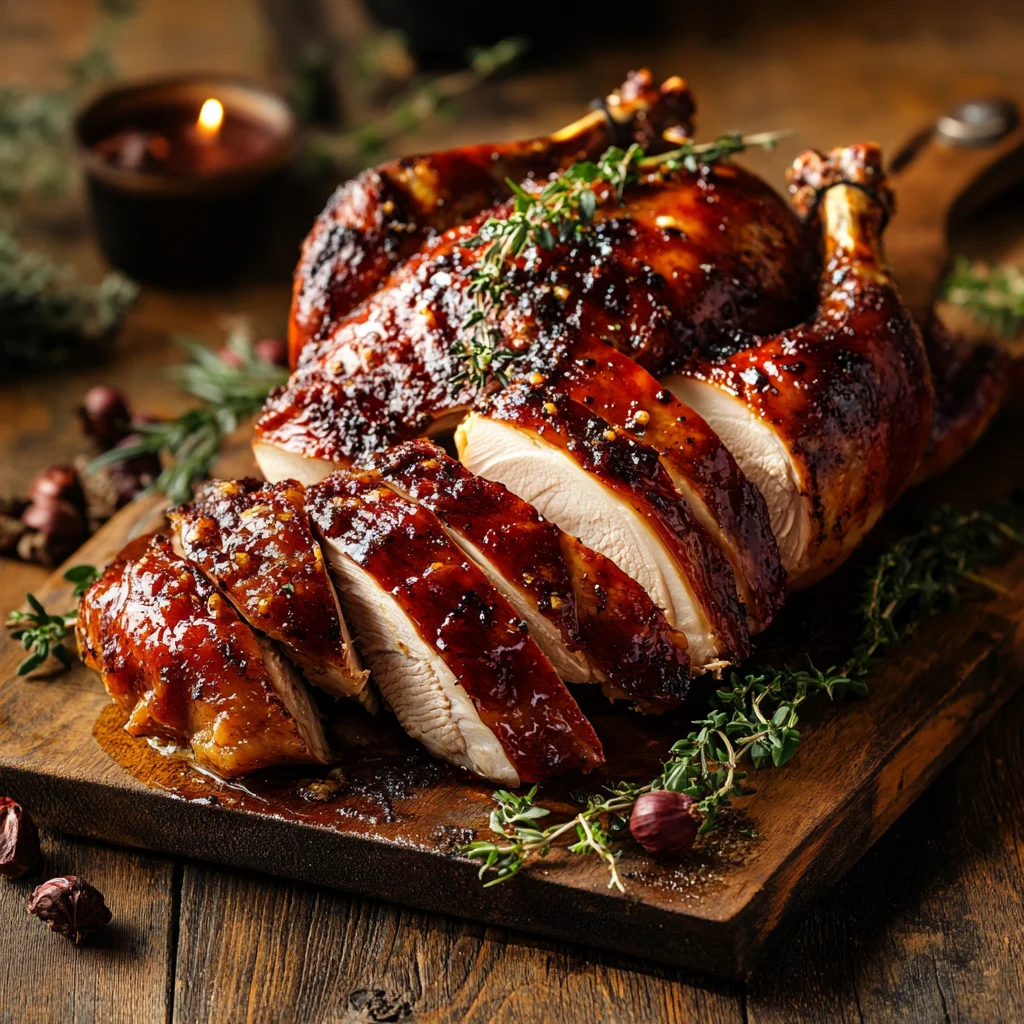
After resting, your turkey is now ready to be carved and served! The deep-fried turkey’s crispy skin and juicy meat make it a standout dish for any gathering.
Step 15: Carve the Turkey
Begin carving the turkey by cutting off the legs and thighs first. Then, move to the breast and slice it against the grain for the most tender results. You can use a carving fork and a sharp knife for the job. If you prefer, you can also use an electric knife for smooth, easy slices.
Tip: Don’t forget to serve the crispy skin along with the meat. It adds incredible flavor and texture to the dish.
Step 16: Serve and Enjoy
Serve your crispy deep-fried turkey with your favorite sides. This dish pairs wonderfully with mashed potatoes, stuffing, green beans, and cranberry sauce. Be sure to carve the turkey into bite-sized pieces to make it easy for your guests to enjoy.
Part 3: Storing and Reusing Leftover Deep Fried Turkey
After all the excitement of a deep-fried turkey feast, you might have some leftovers. No worries—there are plenty of ways to store and repurpose your turkey for future meals. Let’s go over how to properly store your leftover turkey and some creative ideas to reuse it in delicious ways.
Step 17: Storing Leftover Deep Fried Turkey
Proper storage of leftover turkey is key to maintaining its moisture and flavor. Here’s how to do it:
Refrigerating Leftovers
Once your turkey has cooled down to room temperature, carve it into pieces and place them in an airtight container. Store the turkey in the refrigerator for up to 3-4 days. This method preserves the turkey’s flavor and prevents bacterial growth.
Freezing Leftovers
If you don’t plan to eat your leftover turkey within a few days, you can freeze it. Place the turkey in a freezer-safe, airtight container or wrap it tightly in plastic wrap and aluminum foil. It will stay fresh for up to 3 months in the freezer.
Tip: When reheating frozen turkey, it’s best to thaw it overnight in the refrigerator before warming it up. Reheating from frozen can cause the meat to dry out.
Part 3.1: Creative Ways to Repurpose Leftover Deep Fried Turkey
Now that you’ve stored your leftover turkey, it’s time to get creative! Deep-fried turkey can be used in a variety of dishes that will keep your meals exciting. Here are a few ideas to get you started:
Turkey Sandwiches or Wraps
Shredded deep-fried turkey makes an excellent filling for sandwiches or wraps. Spread some mayonnaise, mustard, or cranberry sauce on your bread or wrap, then pile on the turkey. Add some lettuce, tomato, or avocado for extra flavor. These sandwiches are perfect for lunch or a quick snack.
Tip: For a warm option, you can toast the sandwich with cheese, giving it a delicious melt!
Turkey Soup or Stew
Transform your leftover turkey into a comforting soup or stew. Simply shred the turkey and add it to a pot with broth, vegetables, herbs, and your choice of seasonings. This hearty dish is a great way to warm up on chilly days.
Tip: For a flavorful twist, add some cajun seasoning or a splash of hot sauce to give the soup a kick.
Turkey Tacos or Burritos
Shredded turkey works wonderfully in tacos or burritos. Warm up the turkey and add it to soft tortillas along with your favorite toppings like cheese, lettuce, sour cream, and salsa. This is a quick, easy meal that brings new life to your leftovers.
Turkey Salad
For a lighter meal, try a turkey salad. Shred the leftover turkey and mix it with fresh greens, grapes, walnuts, apple slices, and a light vinaigrette dressing. The crunchy turkey pairs beautifully with the crisp vegetables and fruits.
Part 3.2: Reheating Leftover Deep Fried Turkey
When reheating your leftover turkey, it’s important to do so in a way that preserves the meat’s flavor and crispy texture. Here’s how you can reheat turkey without compromising quality:
Reheating in the Oven
The oven is the best method for reheating deep-fried turkey because it helps maintain the crispy skin. Preheat the oven to 350°F (175°C). Place the turkey pieces on a baking sheet lined with parchment paper, making sure they aren’t overcrowded. Heat the turkey for 15-20 minutes, or until it reaches an internal temperature of 165°F (74°C).
Reheating in the Microwave
If you’re in a hurry, the microwave can be used, but it might not keep the turkey as crispy. Place the turkey pieces on a microwave-safe plate and cover with a damp paper towel. Microwave in 30-second intervals, checking the temperature until the turkey is heated through.
Tip: To retain moisture, you can drizzle a little chicken broth over the turkey before microwaving.
Reheating in a Skillet
For a quick, crispy option, you can reheat turkey in a skillet. Heat some olive oil or butter over medium heat and add the turkey pieces. Cook for 2-3 minutes on each side until the turkey is heated through and the skin becomes crispy again.
Part 3.3: Turkey Leftover Storage Tips
Storing leftover turkey properly is crucial to prevent food waste. Here are some additional storage tips to help you maximize your leftovers:
Labeling and Dating Your Leftovers
When storing leftover turkey, be sure to label your containers with the date they were cooked. This helps ensure you use the turkey within the recommended time frame (3-4 days in the fridge or 3 months in the freezer).
Using Freezer Bags for Turkey Storage
For easy freezer storage, place leftover turkey in freezer bags, removing as much air as possible to avoid freezer burn. You can even separate the turkey into meal-sized portions so it’s easier to defrost and reheat when needed.
Part 4: Common Mistakes to Avoid When Deep Frying a Turkey
While deep frying a turkey can yield delicious results, it’s easy to make mistakes that can ruin your meal or even pose safety risks. Let’s explore some common mistakes and how to avoid them.
Mistake 1: Using Too Much Oil
Many people make the mistake of using excessive oil, leading to spillage when the turkey is lowered into the fryer. This can cause dangerous flare-ups and burns. To prevent this, always check the oil level before heating.
How to Avoid It:
Before heating the oil, submerge your turkey into the fryer without turning on the heat. Check the oil level by noting where the turkey causes the oil to rise. Remove the turkey and mark the oil level. That’s your ideal amount of oil.
Mistake 2: Not Drying the Turkey Enough
Moisture is the enemy when deep frying a turkey. If the turkey has any moisture on its skin, it can cause the hot oil to splatter and even boil over, potentially causing burns or fires.
How to Avoid It:
Pat the turkey dry with paper towels both inside and out. Make sure that no water or moisture remains before placing the turkey in the oil. This is a simple step that can save you from a messy and dangerous situation.
Mistake 3: Cooking at the Wrong Temperature
Frying a turkey at the wrong temperature can lead to a turkey that’s either undercooked or overcooked. The sweet spot for frying a turkey is 350°F (175°C). Anything higher, and you risk burning the skin; anything lower, and the turkey will absorb too much oil.
How to Avoid It:
Invest in a good-quality deep-fry thermometer to monitor the oil temperature accurately. Check the temperature regularly, especially when adding the turkey, to ensure it stays at the optimal level.
Part 4.1: Troubleshooting Common Turkey Frying Problems
Even if you follow the recipe carefully, things can still go wrong. Don’t worry—let’s look at some common frying problems and their solutions.
Problem 1: Turkey Doesn’t Cook Evenly
It’s frustrating when parts of the turkey are undercooked while others are overcooked. This usually happens if the turkey is too big for the fryer or not fully submerged in the oil.
How to Fix It:
To ensure even cooking, choose a turkey that fits comfortably in the fryer. If needed, cut the turkey into smaller pieces before frying. You can also rotate the turkey halfway through the cooking time to ensure that all sides cook evenly.
Problem 2: The Turkey Skin Is Not Crispy
If your turkey skin isn’t getting crispy, it could be because the oil temperature is too low. This results in a soggy skin and a greasy turkey.
How to Fix It:
Make sure the oil temperature is at 350°F (175°C) before placing the turkey in the fryer. Don’t overcrowd the fryer, and fry the turkey in small batches if necessary. The oil needs to circulate freely to crisp up the skin.
Problem 3: Overcooked Turkey
If the turkey is overcooked and dry, it may be due to leaving it in the fryer for too long or the temperature being too high.
How to Fix It:
To avoid overcooking, check the turkey’s internal temperature frequently with a meat thermometer. Remember, the turkey is done when the internal temperature of the breast reaches 165°F (74°C) and the thigh reaches 180°F (82°C). Once you hit these temperatures, immediately remove the turkey from the oil.
Part 4.2: Tips for Perfecting Your Deep Fried Turkey
Now that we’ve covered the common mistakes and troubleshooting tips, let’s explore some advanced techniques and tips for perfecting your deep-fried turkey.
Tip 1: Brine Your Turkey Before Frying
Brining the turkey before frying can significantly improve its juiciness and flavor. The brine helps the turkey retain moisture during the frying process, preventing it from drying out.
How to Brine Your Turkey:
To brine your turkey, mix water, salt, sugar, and your choice of seasonings in a large container. Submerge the turkey in the brine for 12-24 hours in the refrigerator. After brining, pat the turkey dry thoroughly before frying.
Tip 2: Inject Flavors into the Turkey
Injecting the turkey with marinades or seasonings is a great way to ensure it’s packed with flavor. Using a marinade injector, you can add spices, herbs, butter, or even citrus juices deep into the meat.
How to Inject the Turkey:
Fill the marinade injector with your choice of flavoring, and inject it into various parts of the turkey. Be sure to inject the legs, thighs, and breast for an evenly seasoned turkey. Avoid overfilling any one area to prevent the skin from tearing.
Tip 3: Rest the Turkey After Frying
Resting your turkey after frying is essential for keeping it moist. When you allow the turkey to rest, the juices redistribute throughout the meat, making it more tender and flavorful.
How to Rest the Turkey:
After removing the turkey from the fryer, place it on a cutting board or large platter. Let it rest for 10-15 minutes before carving. During this time, the juices will settle, ensuring each bite is juicy and tender.
Part 5: Delicious Side Dishes to Pair with Deep Fried Turkey
When it comes to serving your deep-fried turkey, the sides can really make the meal complete. From savory mashed potatoes to fresh salads, there are plenty of sides that pair wonderfully with the rich and crispy flavors of fried turkey. Let’s explore some delicious side dishes that will complement your main course perfectly.
Side 1: Creamy Mashed Potatoes
Mashed potatoes are a classic side dish that goes hand-in-hand with turkey. The creaminess of mashed potatoes balances out the crispy and juicy turkey, making for a satisfying and comforting combination.
Ingredients for Creamy Mashed Potatoes:
- 4 large potatoes, peeled and cubed
- 1/2 cup butter
- 1/2 cup milk
- Salt and pepper, to taste
- 1/4 cup sour cream (optional for extra creaminess)
Instructions:
- Boil the potatoes in salted water until tender (about 15-20 minutes).
- Drain and mash the potatoes in a large bowl.
- Add the butter and milk, mixing until smooth and creamy.
- Season with salt and pepper, and stir in sour cream if desired.
Mashed potatoes are simple yet delicious, and they make a perfect match with deep-fried turkey.
Side 2: Roasted Vegetables
Roasted vegetables are a healthy and flavorful side dish that complements the rich flavors of fried turkey. The natural sweetness of the roasted vegetables pairs well with the savory turkey, adding a nice balance to your meal.
Ingredients for Roasted Vegetables:
- 1 cup carrots, sliced
- 1 cup Brussels sprouts, halved
- 1 cup sweet potatoes, cubed
- 2 tbsp olive oil
- 1 tsp garlic powder
- Salt and pepper, to taste
Instructions:
- Preheat the oven to 400°F (200°C).
- Toss the vegetables in olive oil, garlic powder, salt, and pepper.
- Spread the vegetables evenly on a baking sheet.
- Roast for 25-30 minutes, or until tender and golden brown, stirring halfway through.
These roasted vegetables are a perfect side that’s easy to prepare and full of flavor!
Side 3: Classic Stuffing
Stuffing is a must-have on any holiday table, and it’s no exception when you’re serving deep-fried turkey. Its savory flavors and soft texture provide a great contrast to the crispy turkey, making it a wonderful side dish to enjoy.
Ingredients for Classic Stuffing:
- 4 cups cubed bread (preferably day-old)
- 1 onion, chopped
- 2 celery stalks, chopped
- 1/4 cup butter
- 2 cups chicken broth
- 1 tsp dried sage
- Salt and pepper, to taste
Instructions:
- Preheat the oven to 375°F (190°C).
- In a large pan, sauté the onions and celery in butter until soft.
- Add the bread cubes, chicken broth, sage, salt, and pepper. Mix well.
- Transfer the mixture to a baking dish and bake for 25-30 minutes, or until golden and crisp on top.
This classic stuffing recipe is full of savory flavors that perfectly complement the deep-fried turkey.
Side 4: Fresh Green Bean Almondine
For a lighter, fresher option, green bean almondine is an excellent choice. The crisp texture of the green beans combined with the nutty flavor of almonds offers a wonderful contrast to the fried turkey, making it a great side to balance out the richness of the meat.
Ingredients for Green Bean Almondine:
- 1 lb fresh green beans, trimmed
- 1/4 cup sliced almonds
- 2 tbsp butter
- 1 tbsp lemon juice
- Salt and pepper, to taste
Instructions:
- Blanch the green beans in boiling water for 3-4 minutes, then drain and set aside.
- In a pan, melt butter and sauté the almonds until golden brown.
- Add the green beans and sauté for an additional 2-3 minutes.
- Drizzle with lemon juice, season with salt and pepper, and serve.
This fresh and light side dish adds a bright pop of color and flavor to your plate.
Side 5: Cranberry Sauce
Cranberry sauce is a classic side dish that brings a touch of sweetness and tartness to balance the rich flavors of turkey. It’s quick to make and provides a perfect complement to fried turkey.
Ingredients for Cranberry Sauce:
- 12 oz fresh cranberries
- 1 cup sugar
- 1/2 cup water
- 1 tsp orange zest (optional)
Instructions:
- In a saucepan, combine the cranberries, sugar, and water.
- Bring to a boil, then reduce heat and simmer for 10-15 minutes until the cranberries burst and the sauce thickens.
- Stir in orange zest, if desired, and let the sauce cool before serving.
The sweet and tart flavor of cranberry sauce is a classic that never disappoints with turkey.
Part 5.1: Drinks to Pair with Deep Fried Turkey
While we’re avoiding alcoholic beverages and focusing on non-alcoholic options, there are still plenty of drinks that can complement the rich flavors of deep-fried turkey. Here are some refreshing and delicious drink ideas:
Citrus Lemonade
The tangy and refreshing flavors of lemonade are a great pairing with deep-fried turkey. You can make fresh lemonade by combining freshly squeezed lemon juice, water, and a bit of sugar. It’s the perfect drink to balance out the richness of the fried turkey.
Iced Tea
Iced tea, whether sweetened or unsweetened, is another great option to serve with deep-fried turkey. The light, slightly bitter flavor of tea is a great contrast to the richness of the turkey and pairs well with many of the sides.
Fruit Infused Water
For a light and healthy drink, try fruit-infused water. Add slices of fruits like lemon, lime, cucumber, or mint to a pitcher of water and let it chill. This adds a subtle flavor to your water that pairs perfectly with a hearty turkey meal.
Part 6: Tips to Elevate Your Deep Fried Turkey Game
Now that you have a fantastic recipe and side dishes to pair with your deep-fried turkey, let’s take things up a notch! Here are some expert tips that will elevate your deep-fried turkey game and impress your guests.
Tip 1: Use a Dry Rub for Extra Flavor
While brining and injecting marinades are great ways to add flavor, using a dry rub can also make your turkey extra flavorful. A dry rub creates a flavorful crust on the turkey’s skin, enhancing both the texture and taste.
How to Make a Simple Dry Rub:
- 2 tbsp paprika
- 1 tbsp garlic powder
- 1 tbsp onion powder
- 1 tbsp brown sugar
- 1 tsp salt
- 1 tsp pepper
- 1/2 tsp cayenne pepper (optional for a little heat)
Mix all the ingredients together and rub the mixture all over your turkey, making sure to cover every inch of the skin. Let it sit for about 30 minutes to absorb the flavors before frying.
Tip 2: Consider Using Peanut Oil for Frying
The oil you choose to fry your turkey with plays a huge role in the final taste. Peanut oil is often preferred because it has a high smoking point, meaning it won’t burn or break down at the high temperatures needed for frying.
Why Choose Peanut Oil:
- It has a neutral flavor that won’t overpower the turkey’s taste.
- It has a high smoke point (around 450°F/232°C), making it ideal for deep frying.
- It produces a crispy, golden crust that’s perfect for turkey.
While peanut oil can be more expensive than vegetable oil, the benefits it brings to your turkey are worth the investment. However, if you have allergies to peanuts, vegetable oil or canola oil can also work well.
Tip 3: Double Frying for Extra Crispiness
If you’re aiming for ultra-crispy skin, double frying can make a significant difference. Double frying means frying the turkey twice for a shorter period of time. The result is a crunchy, golden skin that will have your guests coming back for seconds.
How to Double Fry:
- Fry the turkey for the standard cooking time, about 3-4 minutes per pound.
- Once the turkey is fully cooked and golden, remove it from the oil and let it rest for 10 minutes.
- Heat the oil back up to 375°F (190°C) and fry the turkey for an additional 2-3 minutes.
- Remove the turkey and let it rest again before carving.
This method will give you the crispiest turkey skin, and it’s definitely worth trying for special occasions.
Tip 4: Don’t Skip the Resting Period
When you remove the turkey from the fryer, it’s essential to let it rest. While it might be tempting to start carving immediately, resting the turkey ensures that the juices inside redistribute, keeping the meat moist and tender.
How to Rest the Turkey:
- After removing the turkey from the fryer, place it on a cutting board or platter.
- Let it rest for at least 10-15 minutes before carving.
- Tent the turkey loosely with foil to retain warmth while it rests.
This simple step ensures your turkey will be juicy and flavorful, and it’s something you should never skip!
Part 6.1: Creative Twists for Deep Fried Turkey
Looking to impress your guests with something unique? Here are some creative twists on traditional deep-fried turkey that will make your meal unforgettable.
Twist 1: Deep Fried Turkey with a Cajun Spice
If you love bold, zesty flavors, a Cajun-style deep-fried turkey might be the way to go. The spicy and smoky Cajun seasoning will add a delightful kick to your turkey, making it stand out from the crowd.
How to Make Cajun Spice:
- 1 tbsp paprika
- 1 tbsp cayenne pepper
- 1 tbsp onion powder
- 1 tbsp garlic powder
- 1 tsp thyme
- 1 tsp oregano
- Salt and pepper to taste
Mix all the ingredients and rub it generously on the turkey before frying. You can also add a little Cajun seasoning to your brine or marinade for an extra punch.
Twist 2: Deep Fried Turkey with Lemon and Herbs
For a fresh, citrusy twist, try using lemon and herbs to flavor your turkey. The combination of zesty lemon and fragrant herbs like rosemary and thyme will complement the rich fried skin and juicy meat.
How to Add Lemon and Herbs:
- Stuff the turkey’s cavity with fresh lemon slices, rosemary, and thyme before frying.
- You can also squeeze some fresh lemon juice over the turkey just before serving for an added burst of flavor.
- Brush the turkey with melted butter mixed with chopped herbs before frying to ensure the skin is fragrant and flavorful.
Twist 3: Sweet and Spicy Glaze
If you like a combination of sweet and spicy flavors, consider glazing your turkey with a sweet and spicy sauce towards the end of frying. This will give the turkey an extra layer of flavor and a glossy, mouthwatering finish.
How to Make a Sweet and Spicy Glaze:
- 1/4 cup honey
- 2 tbsp soy sauce
- 1 tbsp sriracha sauce
- 1 tbsp apple cider vinegar
- 1 tsp ginger powder
Mix all the ingredients and brush the glaze onto the turkey during the last 5 minutes of frying. This will create a deliciously sticky and flavorful crust on your turkey.
Part 7: Troubleshooting and Frequently Asked Questions About Deep Fried Turkey
Even with a well-prepared plan, deep frying a turkey can sometimes present a few challenges. In this section, we’ll address common issues and answer frequently asked questions to ensure your turkey turns out perfectly every time.
Problem 1: Turkey Doesn’t Cook Evenly
One of the most common problems when deep frying turkey is uneven cooking. This can happen if the oil temperature is too low, or if the turkey isn’t submerged properly.
How to Fix It:
- Check the Oil Temperature: Ensure your oil is at the correct temperature (375°F or 190°C) before lowering the turkey into the fryer. Using a thermometer will help maintain consistency.
- Submerge the Turkey Fully: Make sure the turkey is fully submerged in the oil. If it floats, you may need to adjust the turkey or fryer setup.
- Consider Frying Smaller Turkeys: If you’re frying a larger bird, the oil might not reach the interior properly. Consider frying a smaller turkey or reducing the cooking time to prevent uneven cooking.
By keeping an eye on the temperature and ensuring your turkey is fully immersed, you can solve most issues related to uneven cooking.
Problem 2: Turkey Skin Isn’t Crispy
A crispy exterior is one of the best parts of deep-fried turkey. If your turkey skin is soggy or not as crispy as you’d like, it might be due to low oil temperature or inadequate oil quality.
How to Fix It:
- Maintain the Correct Oil Temperature: Make sure the oil is at the optimal frying temperature (375°F or 190°C). If the temperature is too low, the turkey skin will not crisp up properly.
- Use Fresh Oil: If you’re reusing oil from a previous fry, the oil may have lost its ability to crisp up the skin. Always use fresh oil for the best results.
- Double Frying: As mentioned in Part 5, consider double frying the turkey for an extra crispy finish.
Double frying is a simple trick that can make a world of difference in achieving that golden, crispy skin.
Problem 3: The Turkey Has an Oily Taste
If your turkey has an oily or greasy flavor, it might have been fried at too high of a temperature or for too long.
How to Fix It:
- Don’t Overcook the Turkey: Follow the recommended frying time (3-4 minutes per pound). Overcooking can lead to an oily, greasy taste.
- Rest the Turkey After Frying: After you remove the turkey from the fryer, let it rest on a paper towel-lined plate to absorb any excess oil. Resting also helps lock in the juices.
By managing your frying time and allowing your turkey to rest, you’ll avoid that oily aftertaste.
Frequently Asked Questions (FAQs)
1. Can I deep fry a frozen turkey?
No, you should never fry a frozen turkey. When frozen, the turkey has a lot of water inside, which can cause dangerous splattering when dropped into hot oil. Always thaw your turkey completely before frying. This will also help prevent uneven cooking and burning.
2. How long should I fry a 12-pound turkey?
A 12-pound turkey typically requires about 36 to 48 minutes of frying time (3-4 minutes per pound). Be sure to monitor the temperature and check the internal temperature to ensure it’s cooked thoroughly (165°F or 74°C in the thickest part of the turkey).
3. What kind of oil should I use for deep frying?
Peanut oil is a popular choice for deep frying because it has a high smoking point and neutral flavor. If you have a peanut allergy, you can use canola or vegetable oil as alternatives.
4. How can I tell when my turkey is done?
The best way to determine if your turkey is done is by using a meat thermometer. Insert the thermometer into the thickest part of the turkey (usually the thigh). When the internal temperature reaches 165°F (74°C), your turkey is safe to eat.
5. Can I reuse frying oil?
Yes, you can reuse frying oil. However, make sure to strain out any debris, and store the oil in a clean, sealed container. You can reuse oil up to three times, but always check for any changes in the oil’s quality, like dark color or off smells.
6. How do I safely dispose of used frying oil?
Never pour used frying oil down the drain, as it can clog pipes. Instead, allow the oil to cool, then pour it into a sealed container (like an empty bottle or jar) and dispose of it in the trash. Some recycling centers may accept used cooking oil, so check for any local options.
7. Can I deep fry a turkey indoors?
It’s not recommended to deep fry turkey indoors because it can pose serious fire hazards. Always deep fry turkey outdoors in a well-ventilated area, away from structures and flammable materials. Use a proper deep fryer with safety features, and keep a fire extinguisher nearby.
Troubleshooting Summary
Deep-frying a turkey can be tricky, but by following the tips and guidelines in this article, you can avoid common issues and enjoy a perfectly fried bird every time. Be sure to pay attention to oil temperature, use fresh ingredients, and allow your turkey to rest after frying. With the right preparation, you can serve a crispy, juicy turkey that everyone will love.
2 thoughts on “Deep Fried Turkey: How to Make Step-by-Step Guide”